hello i am here today to not lose track of the art cheats i have discovered over the years. what i call art cheat is actually a cool filter/coloring style/way to shade/etc. that singlehandedly makes art like 20 times better
Thank you! But oh gosh, I really am the last person you should ask for a tutorial. I don’t think I have any conscious technique to it, I just sort of wing it. But I’m gonna try my best to explain my thoughts on different body types and how I draw them! I don’t draw shapes in the way I think you mean. At least I’m guessing you’re referring to something like this:
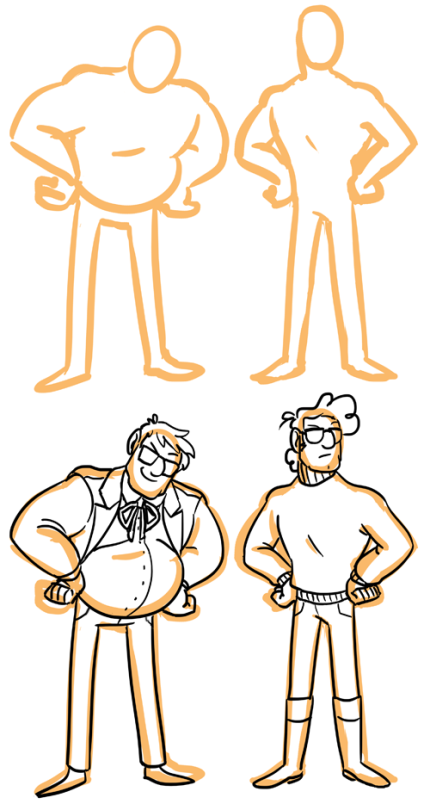
While I think this could actually be a pretty good way to go about it, this isn’t how I work. What I do is, I draw a rough outline of the character using a thick brush. Let’s take the sketch and line art of this drawing of Stan as an example:
So as you can see, there’s no real shapes or help lines or anything like that. But what I can tell you is this: when I draw bodies I always try to make them as dynamic as possible! My tip for drawing bodies is EXAGGERATE, EXAGGERATE, EXAGGERATE! Exaggerate the body types of different characters to add variety! Exaggerate different parts of the same character to make them more dynamic!
Since we’re on the topic of Stan, let’s talk about Stan and Ford. Identical twins with different body shapes? You can bet your sweet ass I’m gonna exaggerate those two in completely different directions! Identical twins are like the holy grail of character design practice – take two characters with the same face and see just how different you can make them! Let’s draw a quick doodle of the Stan twins:
Even in the rough outline you can clearly tell who’s who just from their body shapes. If you want to practice drawing different body types, I highly recommend trying to make the characters distinct from each other at the earliest possible stage of your drawing. Try to make it so that even from a rough sketch with no facial features or clothes you’ll still be able to tell which character is which!
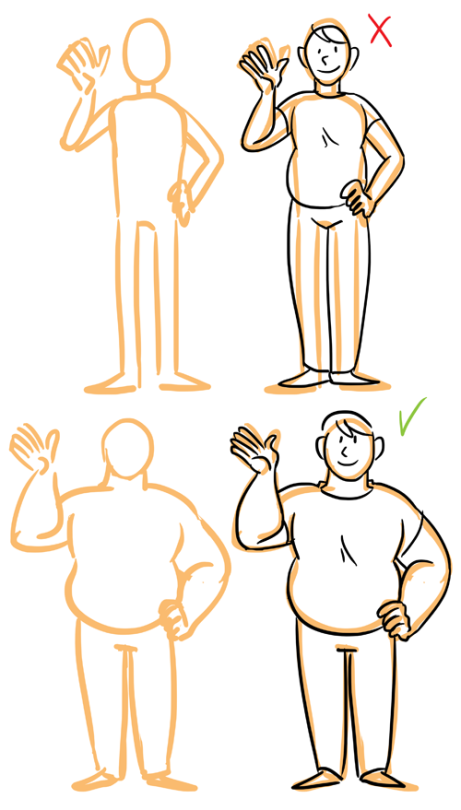
Why am I going on about this? Because body shapes should not be treated as an afterthought! They need to be there, right from the beginning, right from the very first draft! I quite often see people draw fat characters that just look… odd. And you know why they look odd? Because it looks like the artist just sketched an average person and then added some chub during the line art process. Human bodies don’t really work like that! Unless we’re talking like a beer belly here, then the fat will be more evenly distributed across at least part of the body. This affects things like breadth of shoulders and hips, in other words the very frame of the body. If you’re a cartoonist, just adding some chub to a sketch of an average frame will never get a result that is as good and dynamic as a character than was drawn as fat from the very first draft (and this is why I think working from shapes can be very beneficial!).
Okay, so drawing different body types requires both planning and variety. But how do I go about designing a body? Well, personally, I work a lot with contrast, not only between different characters, but also within a single character. Since we’re on the subject of the Stan twins, let’s talk about Ford a bit. Ever wondered why I draw him with the same skinny legs as Stan, even though they’re thicker than his in canon? Well, part of it is because I draw them as identical and thus their fat distribution would work in the same way. But more importantly, it’s because my art style relies heavily on contrast in order to make characters appear as dynamic as possible!
I often draw characters like this – where one half of the body is broad/thick and the other narrow/thin. Let’s refer to it as ‘horizontal exaggeration’.
But what if I want to draw a character that is thin or thick all over? Can I still make them exaggerated and dynamic? Heck yeah, I can! Let’s talk about, uh, let’s call it ‘vertical exaggeration’! On the average human being, the midpoint of the body is at crotch level. Playing around with this midpoint helps a lot with making cartoony body types more dynamic!
Want to draw an overall thin character? Putting their crotch line higher up than usual will help emphasize how gangly they are. Meanwhile, a fat or stocky character is often drawn with a lower crotch line to help emphasize their girth.
In summary… I don’t really have any special techniques to teach anyone, but I really want to encourage people not to be afraid to exaggerate when it comes to body shapes! Exaggerate horizontally! Exaggerate vertically! Make those bodies weird and dynamic! I realize this is more of a rambling mess then a tutorial, but, uh… I hope someone might have found this helpful?
And last but not least… Don’t worry if you can’t draw different body types just yet – just keep drawing and practicing and you’ll get the hang of it eventually! I think a lot of us have been at that stage where we were only able to draw skinny characters. Let’s take a look at how I drew bodies 8 and a half years ago and end this with a laugh!
If I can move past this stage, then so can all of you! Just keep drawing, keep practicing, and most of all, keep having fun doing it! Good luck!
I decided to share my notes taken from this amazing 1 hour Youtube lecture by Marty Lobdell. i really liked him and his tips, i think they are super effective and cover a lot of situations! i highly recommend it!!!!! wow
but here are the tips and examples Marty mentions, so if you don’t have the time to go through the full hour, you can just scroll down. hope this helps somebody!
Break your study time in chunks with breaks
most students lose focus at 25 minutes
it’s a mistake to keep going once you do, since you won’t actually learn anything and you’ll hate every minute of it
so when you start losing focus take a 5 minute break
do something nice like talking to someone or listening to music
it’s something you practice so with time you’ll be able to work for more time without losing focus
in the end of the study session have a big reward you look forward to
Create
a study area
environment highly affects the way you act. Bedrooms are for sleeping, kitchens for eating: you’ll feel sleepy in your bedroom and hungry in the kitchen. So if you have a study area, it’ll be easier to start studying and staying focused.
study in a specific room like an office or school library if you can
if you have to study in your bedroom use a specific object you only use for studying: a lamp/desk. Make it a no-distraction, away from your bed, blank walls area.
The
more active the learning, the better
80% active learning 20% passive
ask yourself: is
it a concept or a fact?
learning a concept: understand/grasp/know it
put it into your own words
really think about the meaning of it
relate it with something you already
know
teach somebody else. Recapitulate
what you’ve learned. Talk out loud even if you don’t have anyone to teach – talk alone. Or at anyone that listens.
learning a fact: memorize it
use mnemonics
Acronyms
(e.g. colours of the rainbow RoyGBiv – red orange yellow green blue indigo
violet)
Coined
sayings – anything popular or sayings you’ve heard since you were a child.
Interacting
images – work even better if they’re weird. Creative associations make you
never forget specific details. (e.g. 1 gram of fat has 9 calories: picture a
fat cat – each cat has 9 lives)
any time 2 things are highly similar
but not the same you will get maximal interference!! USE mnemonics!! (e.g. afferent vs efferent neurons:
SAME – Sensory Afferent Motor Efferent)
Be a part of study
groups
others can help you in ways you never thought before
Recognizing VS remembering
never confuse the two
while reviewing a chapter you may recognize concepts but not actually know them
and when you get to the test you won’t be able to remember any of it
so quiz yourself without looking at it
or stop in a page of your notes/textbook and ask yourself what is the concept immediately after and before it
Get your REM
Sleep
get ~8 hours so you don’t undo your studying
this is how your brain stores permanent
memories
without it you’re ability to remember seriously decreases
most people don’t even begin to take the advice but it’s simple: sleep better. Do better.
There’s
162 hours in a week. There is time.
reflect on what you are doing with your time and what activities you have to prioritize to succed as a student
Taking
notes is vital.
right after the class take 5 minutes to expand everything you’ve jotted down,
give it depth.
NOT hours later. You won’t remember half the things you wrote down.
Ask your questions to class mates and teachers.
teachers want you to succeed and it’s more than ok to ask your question in the teacher’s office or in the next class
How to use a textbook: SQ3R technique
Survey Question Read Recite Review
Survey:
skim through the entire chapter in a couple of minutes.
Raise questions: e.g. what
is osmosis? What is this graphic about? What is a prototype?
it
causes you to look for answers and you’ll find the information better once you actually study it after. If you intend
to find something you learn it better.
Start
studying for tests early.
don’t undo yourself. You should only be reviewing the days before the test. don’t leave it till the last minute!
(don’t just scroll through this!!!! really think about these methods and how you can actually implement them so you can benefit from them!!! these actually work but only if you put them into practice boo good luck!)


